Work preparation
- Spraying on the sides of water bodies (lakes, rivers, etc.) or neighbouring surfaces in the direct catchment area is not permitted.
- When purchasing paint, lacquer and spray material, pay attention to their environmental compatibility.
The spray surface must be clean, dry and grease-free.
- Roughen smooth surfaces and then remove the sanding dust.
When spraying, all non-covered surfaces can be contaminated by the spray mist. Therefore, thoroughly prepare the area around the surface to be sprayed:
- Carefully cover floors, furnishings, doors, windows as well as door and window frames, etc. Painting substrate, for example, is recommended for covering the floors.
- Fix the cover material in place. Cover material that is not fixed in place securely can be detached or blown away by the powerful air jet.
- Carefully mask off plug sockets and switches. Uncovered plug sockets and switches may cause a short-circuit and increase the risk of electric shock.
- When diluting, make sure that the spray material and the diluting agent are compatible. When using a faulty diluting agent, lumps can develop that can lead to clogging of the spray gun.
- When diluting the spray material, make sure that the flash point of the mixture is above 55 °C again after diluting. Diluting substances such as solvent-based lacquers lowers the flash point.
- Note the specifications of the paint manufacturer relating to sprayability, e.g. in the technical information sheet or data sheet. Make sure that you do not spray any paints that are not suitable according to the manufacturer's specifications.
- Stir the spray material thoroughly.
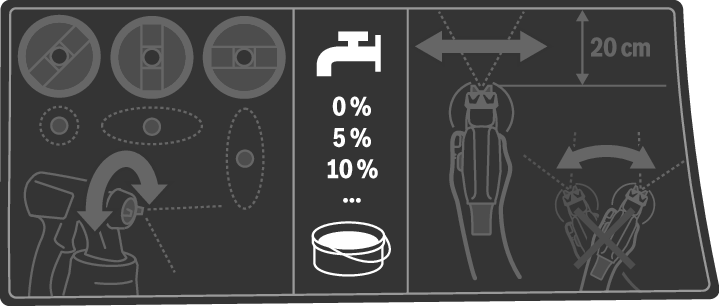
Using spray material at room temperature will yield a better spray pattern. - Dilute the spray material if necessary.
If the spray test does not produce a good spray pattern, dilute in 5 % increments until an optimal spray pattern is achieved.
Spray material | Recommended dilution |
|---|---|
Wood preservatives, water, oils, thin varnishes | 0 % |
Impregnations, anti-rust primers | 0−5 % |
Solvent-dilutable or water-dilutable (recommended) lacquers, primers, radiator lacquers, thick varnishes | At least 5 % |
Dilution table
Spray material | Diluting agent [ml] for dilution | ||
|---|---|---|---|
5 % | 10 % | 15 % | |
300 | 15 | 30 | 45 |
400 | 20 | 40 | 60 |
500 | 25 | 50 | 75 |
600 | 30 | 60 | 90 |
Note: Remove the air hose (17) before pouring in spray material (quarter turn of the bayonet lock (18) anticlockwise; pull the bayonet lock (18) out of the port (4)).
For spray jobs on horizontal surfaces/objects | Towards the front in the direction of the nozzle/air cap |
For spray jobs overhead | Towards the rear in the direction of the handle |
- When using large buckets, pour the spray material into a smaller transfer bucket if necessary (e.g. 10 l wall paint into an empty 2.5 or 5.0 l bucket).
- Unscrew the container (7) from the spray gun.
- Pour the spray material into the container (7) up to no more than the 800 mark.
- Turn the suction tube (12) so that the spray material can be sprayed with almost no residue:
- Carry out a test-spray run on a test surface.
If the spray pattern is optimal, you can begin spraying.
or
If the spraying results are unsatisfactory or no paint is emitted: see Troubleshooting